Wednesday, 18 March 2009

Mothers Day / Easter Basket

To make this basket you will need:

  • Scissors

  • Ruler

  • A4 thin card in assorted colours

  • glue

  • shredded paper

  • stapler


  • To make the basket:
  • Take one sheet of card and every 3cm along the width cut to half way down the depth. Do this for the entire width of the card.


  • Along the opposite length of the card cut little slits about 1cm apart all the way along the bottom of the card, these will enable the bottom of the basket to be attached.

  • Next wrap the card round into a cylinder shape and staple once at the bottom to secure and once half way up the cylinder.


  • Once you have created the basket shape, next pull down all the flaps except two opposing flaps and pull these up and staple to make a handle.


  • To make a bottom for the basket cut a card circle 8cm in diameter, fold up all the little slits and sellotape the bottom in place.


  • Next cut out flower shapes, to decorate the ends of the flaps. Click here for the pattern or make your own.

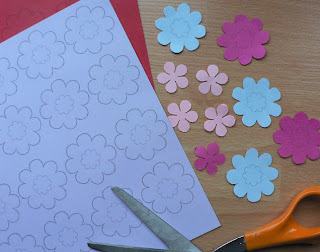
  • Glue the flower shapes to the ends of the flaps and across the handle.

  • Add stredded paper into the basket along with a gift. It could be mini easter eggs, chocolates or soap.

Wednesday, 25 February 2009

Spoon Monsters

To make you will need:
  • 1 Wooden spoon
  • Paint
  • Glue
  • Foam eyes, nose and mouth. You could cut these out of paper or felt also.
  • Double-sided sticky tape
  • Sellotape
  • Coloured paper
  • Pipe cleaners or wool

  • To make:


  • Paint the spoon


  • Glue the mouth, nose and eyes to the monster, we used foam ones but you could make your own from coloured paper.


  • Cut a stripe of coloured paper and fold into a concerntina.


  • Glue hands to the ends and sellotape the arms to the monster. If you tape round the back then the tape can't be seen.


  • Do the same for the feet.
  • Decorate the paper using the paint. We did spots, but you can choose any decoration.
  • Twist a pipe cleaner for the hair and attach to the spoon using double-sided sticky tape. If you have young children you could use wool instead.

Make the monsters as colourful as possible. Maybe give you monster extra legs, arms or add extra eyes.

Friday, 23 January 2009

Patchwork Elephant Using a Milk Carton

For this you will need:


  • Tissue paper in assorted colours
  • 1 Large plastic milk carton with a handle
  • Glue and paint brush
  • Scissors
  • Eyes (not shown) can be googly or cut out of paper

To make :

  • Wash out the milk carton, throw away the lid and cut off the top just following a line around the bottom of the handle. Discard the bottom of the milk carton.
  • Cut out large squares of tissue paper in a variety of colours


  • Glue the squares to the milk carton in a patchwork style
  • Add a couple of eyes either side

Finished Patchwork Elephant by Shelley aged 4

Thursday, 18 December 2008

Christmas Pudding Christmas Card


For this you will need:
  • 1 piece of white A4 card
  • 1 piece of brown paper
  • 1 small piece of green card
  • 1 small red circle
  • glitter
  • white paint
  • black paint
  • glue
  • scissors
  • silver pen
  • paint brush

To make:

  • Fold the white card in half and put to one side

  • Cut a large circle out of the brown paper using the cribkle scissors if you have them.
  • Add some PVA glue to the white paint, approx 50/50 and paint the cream on top of the pudding.

  • Sprinkle the cream with glitter


  • Paint black spots for the fruit in the pudding

  • Cut a holly shape from the green card and glue to the top of the pudding

  • Glue the red circle on top of the holly for the berry

  • Write your message onto the card with the silver pen

  • Glue the finished pudding to the card


Christmas Card by Evan Aged 6

Write your message and send.

Monday, 13 October 2008

Frog Puppet


To make this you will need:


  • Two paper plates

  • Paint colours

  • White paper

  • Coloured card

  • Stickers to decorate

  • Glue

  • Black pen

  • Paint Brushes

  • Sellotape

  • Scissors

To make:

  • First cut one paper plate in half and fold the other in half to create a crease

  • Paint the whole plate a mouth colour such as pink or red

  • Paint the two halves of the plate a body colour


  • Put both plates aside to dry

  • Draw two circles onto the white paper for eyes and cut them out

  • Cut out two large eye socket shapes out of coloured card, then glue the eyes onto them


  • Put two folds at the base of the eye sockets

  • Cut a tongue shape out of the coloured card

  • Once the paint is dry, sellotape the tongue to the inside of the frog mouth

  • Using PVA glue, glue the two half plates to the full plate keeping wrong sides together

  • Allow to dry

  • Sellotape the two eyes to the cut edge of the half plate

  • Decorate with stickers


Finished Frog!!